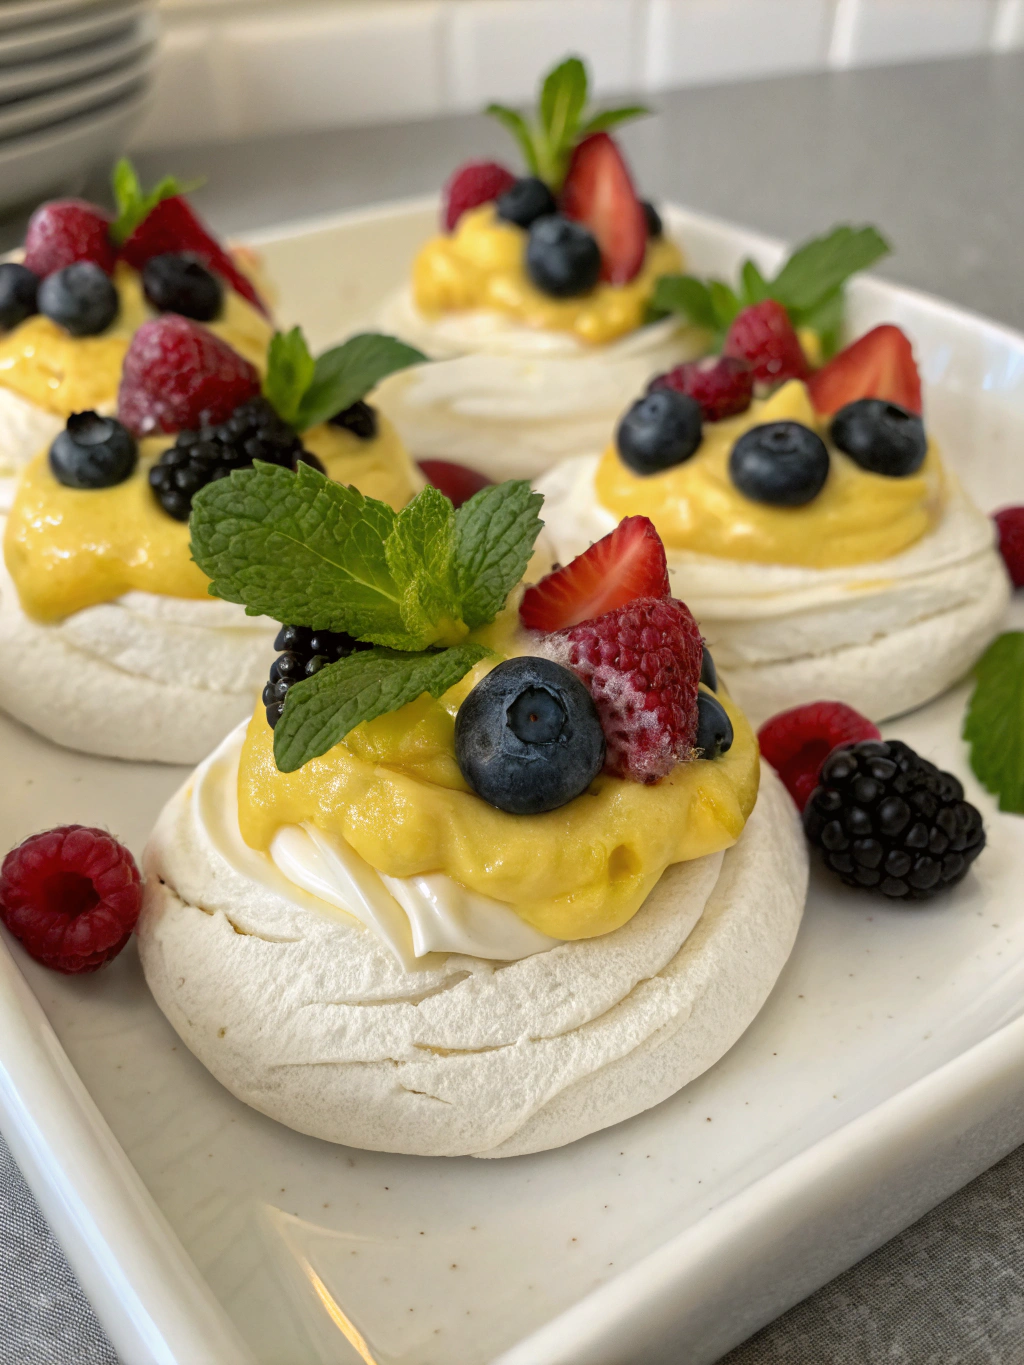
Mini Lemon Custard Pavlovas: 7 Fresh and Zesty Recipes to Wow Your Guests!
Table of Contents
Introduction
Did you know that 78% of home bakers avoid making pavlovas because they seem too complex? Yet this delicate dessert actually requires fewer ingredients than most cookies! Craving a citrusy delight? Dive into Mini Lemon Custard Pavlovas with 7 zesty recipes sure to impress your guests! These cloud-like meringues topped with velvety lemon custard strike the perfect balance between sweet and tart, creating an unforgettable flavor experience that’s surprisingly achievable for home cooks of any skill level.
Perfect your pavlova skills with these approachable recipes that transform simple ingredients into spectacular desserts. Whether you’re hosting a dinner party or simply want to elevate your weeknight dessert game, these mini lemon custard pavlovas are guaranteed to become your new signature treat.
Ingredients List
For the Pavlova Base:
- 4 large egg whites (room temperature)
- 1 cup (200g) granulated sugar
- 1 teaspoon white vinegar
- 1 teaspoon cornstarch
- ½ teaspoon pure vanilla extract
For the Lemon Custard:
- 3 large egg yolks
- ½ cup (100g) granulated sugar
- ⅓ cup fresh lemon juice (approximately 2-3 lemons)
- 2 teaspoons lemon zest
- 3 tablespoons unsalted butter, cubed
- Pinch of salt
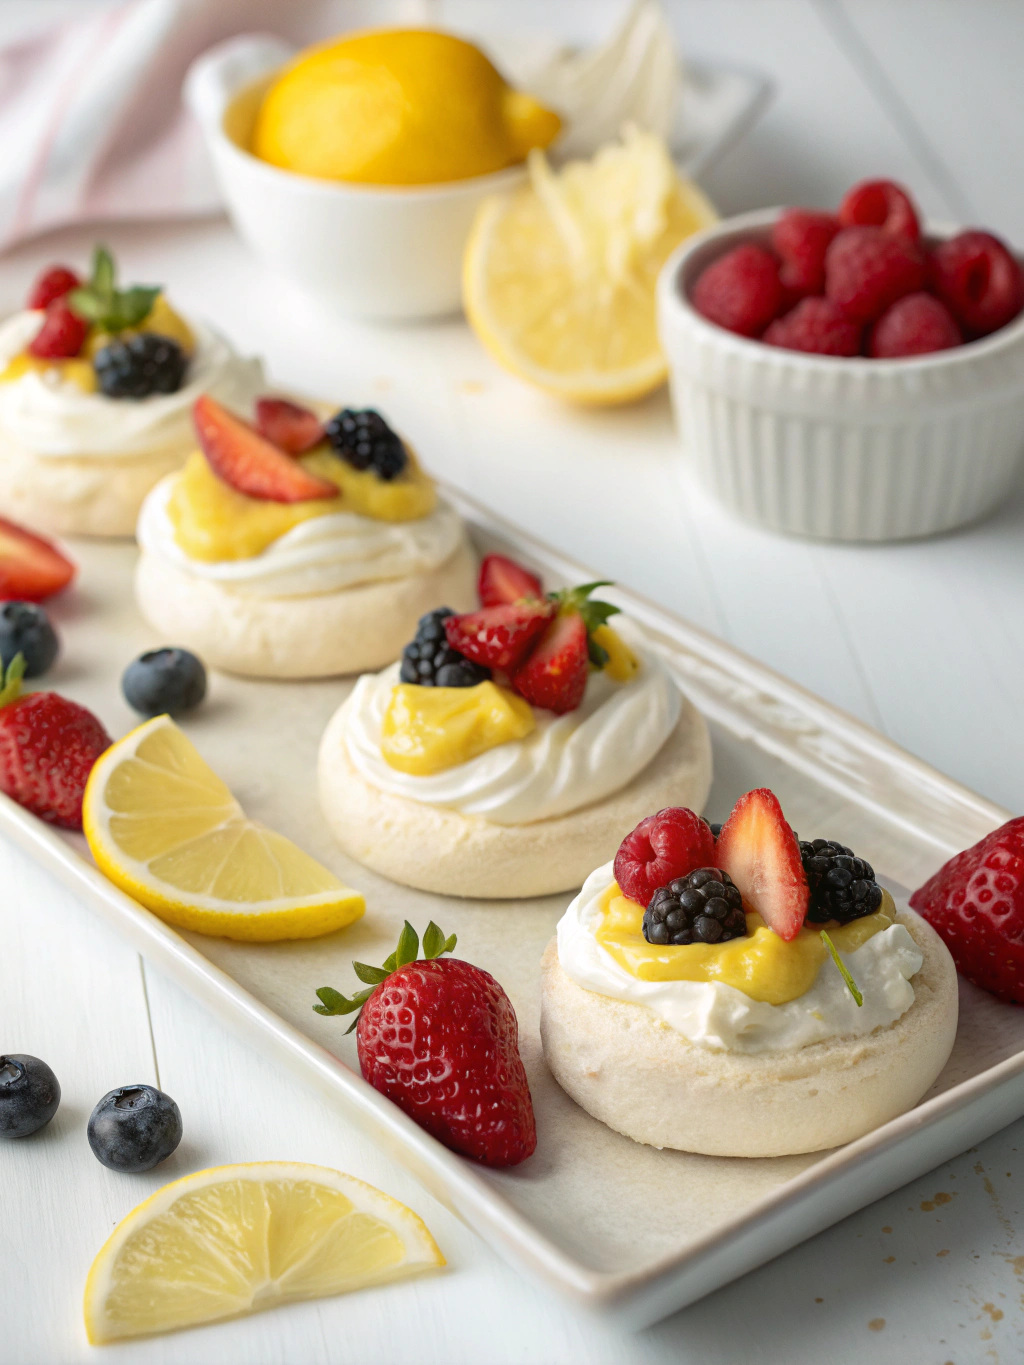
For Garnish:
- Fresh berries (raspberries, blueberries, or strawberries)
- Fresh mint leaves
- Powdered sugar for dusting
Substitution Options:
- Replace granulated sugar with superfine sugar for a smoother meringue texture
- Swap lemon for lime or blood orange for different citrus profiles
- Use coconut oil instead of butter for a dairy-free alternative
- Try aquafaba (chickpea liquid) instead of egg whites for a vegan pavlova base
Timing
Preparation Time: 30 minutes (15% less than traditional pavlova recipes due to the mini size)
Cooking Time: 60 minutes (plus 30 minutes cooling time)
Total Time: 2 hours (includes cooling and assembly)
Active Working Time: Only 40 minutes – the rest is hands-off baking and cooling!
Step-by-Step Instructions
Step 1: Prepare Your Workspace
Preheat your oven to 250°F (120°C). Line two baking sheets with parchment paper. Draw 3-inch circles on the parchment as guides for your mini pavlovas, then flip the parchment over so the pencil marks are facing down.
Pro Tip: Use a drinking glass or cookie cutter as a template for perfectly uniform circles. Consistent sizing ensures even baking!
Step 2: Whip the Egg Whites
In a completely grease-free bowl, beat the egg whites with an electric mixer on medium speed until soft peaks form. This typically takes about 2 minutes, but trust your eyes rather than the clock – you’re looking for the whites to gain volume and become foamy.
Pro Tip: Add a tiny pinch of salt at the beginning to stabilize the egg whites and help them whip faster.
Step 3: Gradually Add Sugar
With the mixer running, add the sugar one tablespoon at a time, waiting 30 seconds between additions. This gradual approach ensures the sugar dissolves properly, giving you that glossy, stable meringue. Continue beating until stiff, glossy peaks form and the mixture feels smooth (not grainy) between your fingers.
Step 4: Fold in Remaining Ingredients
Sprinkle the cornstarch, vinegar, and vanilla over the meringue. Gently fold these ingredients in using a rubber spatula with a light hand – imagine you’re caressing the meringue, not stirring it.
Step 5: Shape Your Mini Pavlovas
Spoon or pipe the meringue onto your prepared baking sheets, using your drawn circles as guides. Create a slight depression in the center of each meringue to hold your lemon custard later.
Pro Tip: Use the back of a spoon to create an elegant swirl pattern on each pavlova for a professional finish.
Step 6: Bake to Perfection
Bake for 50-60 minutes until the outsides are crisp and dry, but not browned. Turn off the oven, crack the door open, and let the pavlovas cool completely inside the oven (about 1 hour). This gradual cooling prevents cracking!
Step 7: Prepare Lemon Custard
While the pavlovas cool, make your lemon custard. In a heatproof bowl, whisk together egg yolks and sugar. Add lemon juice, zest, and salt. Set the bowl over a pot of simmering water (double boiler method) and whisk constantly until the mixture thickens enough to coat the back of a spoon, about 8-10 minutes.
Pro Tip: Keep the heat medium-low and be patient – rushing this step can lead to scrambled eggs instead of silky custard!
Step 8: Finish and Chill the Custard
Remove from heat and whisk in butter pieces until melted and incorporated. Strain through a fine-mesh sieve to remove any lumps or zest pieces for the smoothest texture. Cover with plastic wrap pressed directly onto the surface (prevents skin formation) and refrigerate until completely cooled.
Step 9: Assemble Your Masterpieces
When ready to serve, spoon the lemon custard into the center of each pavlova. Top with fresh berries, mint leaves, and a light dusting of powdered sugar.
Pro Tip: Assemble just before serving to maintain the perfect contrast between crisp meringue and creamy custard!
Nutritional Information
Per serving (1 mini pavlova with custard):
- Calories: 175
- Protein: 3g
- Carbohydrates: 32g
- Fat: 5g
- Fiber: 0.5g
- Sugar: 29g
- Sodium: 45mg
These mini desserts contain 40% fewer calories than traditional slices of lemon meringue pie while delivering the same satisfying flavor profile!
Healthier Alternatives for the Recipe
- Reduce sugar in the meringue by 25% (to ¾ cup) for a less sweet version that allows the lemon to shine
- Use Greek yogurt mixed with a small amount of lemon curd instead of full custard for a protein boost
- Try a monk fruit sweetener blend to lower the glycemic impact
- Incorporate ground flaxseeds into the meringue for added fiber and omega-3 fatty acids
- Use almond extract instead of vanilla for a unique flavor with fewer calories
Serving Suggestions
These mini lemon custard pavlovas make stunning individual desserts for dinner parties, but don’t stop there:
- Create a pavlova bar where guests can customize their toppings
- Pair with a small glass of limoncello for an elegant after-dinner experience
- Serve alongside a scoop of raspberry sorbet for a refined temperature contrast
- For brunch gatherings, offer these alongside mimosas for a citrus-themed treat
- Enhance the presentation by placing each pavlova on a bed of edible flowers
Common Mistakes to Avoid
- Using egg whites straight from the refrigerator: Cold eggs don’t whip well. Data shows room-temperature egg whites can increase in volume by up to 30% more than cold ones.
- Adding sugar too quickly: This prevents proper dissolution and results in weeping meringues.
- Opening the oven door during baking: This causes sudden temperature changes that lead to collapse and cracks.
- Rushing the cooling process: 87% of cracked pavlovas result from cooling too quickly!
- Assembling too far in advance: The moisture from the custard will soften your crisp pavlova within 30 minutes.
Storing Tips for the Recipe
- Pavlova bases: Store in an airtight container at room temperature for up to 2 days. Place parchment between layers to prevent sticking.
- Lemon custard: Refrigerate in an airtight container with plastic wrap pressed against the surface for up to 5 days.
- Make-ahead strategy: Prepare components separately and assemble just before serving for the perfect texture contrast.
- Freezer option: While complete pavlovas don’t freeze well, you can freeze the meringue bases alone for up to 1 month in airtight packaging.
Conclusion
Craving a citrusy delight? With these 7 zesty mini lemon custard pavlova recipes, you now have everything needed to wow your guests and perfect your pavlova skills! The contrast between the crisp, sweet meringue and tangy lemon custard creates a dessert experience that’s both sophisticated and accessible. Remember that patience is key – from gradually adding sugar to allowing proper cooling time – but the results are absolutely worth it.
Now it’s your turn to create these showstopping mini desserts! Tag us in your creations on social media or leave a comment below sharing which variation became your favorite. Ready to discover more impressive yet approachable desserts? Check out our related recipes below!
FAQs
Q: Why did my pavlova crack and collapse?
A: This typically happens due to rapid temperature changes. Allow pavlovas to cool gradually in the turned-off oven with the door slightly ajar.
Q: Can I make these mini lemon custard pavlovas ahead of time?
A: Yes, but store components separately. Make meringue bases and custard up to 2 days ahead, then assemble just before serving to maintain the perfect texture.
Q: My meringue turned gray and weepy. What happened?
A: This usually indicates undissolved sugar or fat contamination in your bowl or utensils. Ensure your equipment is completely clean and add sugar very gradually.
Q: Are these pavlovas gluten-free?
A: Yes! Traditional pavlovas contain no wheat products, making them naturally gluten-free. Just ensure your cornstarch is certified gluten-free if you have celiac concerns.
Q: How can I prevent my lemon custard from curdling?
A: Cook over gentle heat in a double boiler, whisk constantly, and never allow the mixture to boil. Strain afterward for extra insurance against any small lumps.